Analog to digital conversion using DMA for Particle Gen 3 devices (Argon, Boron, Xenon)
Note: This feature is experimental and not supported. It may not work properly. It may break in a future version of Device OS. Beware!
Also, this is the preview release 0.0.1, there may still be bugs.
Introduction
Normally, on Particle (and Arduino) devices, the analogRead() function reads a value from a pin synchronously. There's a limit to how fast you can do this, and also because of the task scheduling on Particle, it's hard to do this regularly.
The nRF52 MCU in the Particle Argon, Boron, and Xenon has the ability to sample the analog to digital converter (ADC) using DMA (direct memory access). This samples the ADC at precise intervals (even when interrupts are disabled) and stores the values in RAM. You can do this into a single buffer if doing a one-shot sample until the buffer is filled. Or you can use double buffers so the capture is continuous. Once one buffer is filled you can begin processing it while the other buffer continues to be filled.
Some caveats:
- This is an unsupported feature.
- You cannot mix calls to ADC DMA and
analogRead()at the same time. In order toanalogRead()you mustuninit()the ADC DMA. - There are hardware timer limitations. In the examples below, NFC cannot be used at the same time as ADC DMA, but if you absolutely need to use NFC you could give up a different peripheral (like Serial1).
You typically create a ADCDMAGen3 object as a global variable. You can only have one per app!
Some constants and two buffers are set up as global variables as well.
You can either set up the settings from setup() or right before you need to use ADC DMA.
Settings are made fluent-style with the withXXX() methods. In the example above:
- Sampling frequency is set to
SAMPLE_FREQ(16000 Hz) - Double buffering is enabled and stores
SAMPLES_IN_BUFFER(1024) samples in each ofbuffer0andbuffer1. When one buffer is filled the bufferCallback is called and the other buffer will continue to be filled. This prevents losing samples while processing a buffer. - Samples pin A0
- Sets the bufferCallback to the function
myBufferCallback. - Finally calls
init()to complete the initialization.
You must call init() and start() to actually start sampling.
You can call init() once and use start() and stop() as necessary.
Or you can call init() and start() whenever you want to sample and call uninit() when done. This will release the ADC resources when not actively being used.
If you want to mix ADC DMA and analogRead() you need to call both uninit() and restoreDefaults(). See the 07-mixed example for more information.
The other thing you need to do is set a bufferCallback, the function that's called when a
The bufferCallback function looks like this:
Because we may want to do lengthy operations we just save the buffer pointer and handle it from loop().
The samples other than 01-simple use a C++11 lambda to handle the buffer callback. That technique can also be used to call a class member function if desired.
In addition to the SAADC (successive approximation ADC) module in the nRF52, this library also requires a hardware timer. Unfortunately there are no free timers available and you'll have to steal one.
- 0: Softdevice - do not use
- 1: Radio - probably best to not use, might work if not using BLE or mesh
- 2: Usart (Serial1) Can use if not using Serial1.
- 3: Usart (Serial2 on Xenon) Cannot be used on Argon or Boron because it's required by NCP.
- 4: NFC - recommended (unless you need NFC). This is the default.
The default is to use the NFC timer, which means you can't use NFC at the same time. If you need NFC, then you can switch to using a different timer using withHardwareTimer().
API documentation
Examples
01-simple
This is the simplest example, and the code is described above in the introduction.
02-audio-over-tcp
This sends audio data to a node.js server (located in the server directory).
I used an Adafruit 1713 Electret Microphone Amplifier - MAX9814 with Auto Gain Control. Connect:
- GND to GND
- Vd to 3V3
- Gain (leave unconnected)
- Out to A0
- AR (leave unconnected)

Make sure you update the example code with the IP address and port of your server.
To install the dependencies:
To run the server:
To sample audio, tap the MODE button. It will connect to the server and send audio for 30 seconds, or until you stop it using the MODE button.
The server saves .wav files in the out directory.
03-one-shot-freq-counter
This code samples A0 to find the dominant frequency. This is best tested by connecting a function generator to A0. Make sure it's set to a sine wave 0 to 3.3V, not sending negative voltages!
This samples at 200 kHz so it can detect frequencies up to a little less than 100 kHz.
The frequency is printed to USB debug serial. You can read it with a serial terminal program or particle serial monitor.
04-continuous-freq-counter
This is a continuous version the frequency counter. When the frequency changes it's printed to the USB debug serial. It's limited to detecting frequencies up to around 24 kHz.
05-dtmf
This example listens to the microphone input on A0 and prints any DTMF (telephone keypad) frequencies it hears to USB debug serial.
06-dtmf-two-channel
This example shows how to handle sampling multiple pins using the DTMF decoder.
07-mixed
This example shows how to switch between ADC DMA and analogRead() mode. Basically, make sure you call:
after using ADC DMA and before using analogRead() again. Then call adc.init() again if you want to use ADC DMA again. You don't need to reset the settings using the withXXX() methods again; they are saved.
More Examples
The more-examples directory contains more examples, mainly based on the SSD1306 display.
more-examples/01-dtmf-display
Works like the 05-dtmf example, but displays the results on a 0.96" OLED SSD1306 display.
<video width="640" height="360" controls=""> <source src="images/dtmf.mp4" type="video/mp4"> </video>
more-examples/02-spectrum
Based on the 04-continuous-freq-counter example, instead of picking the dominant frequency it displays the results on a SSD1306 display showing the amplitude on each frequency bucket.
I'm not completely sure the results are correct, however it does display something, and does update at 20 millisecond intervals, which is pretty impressive, in my opinion.
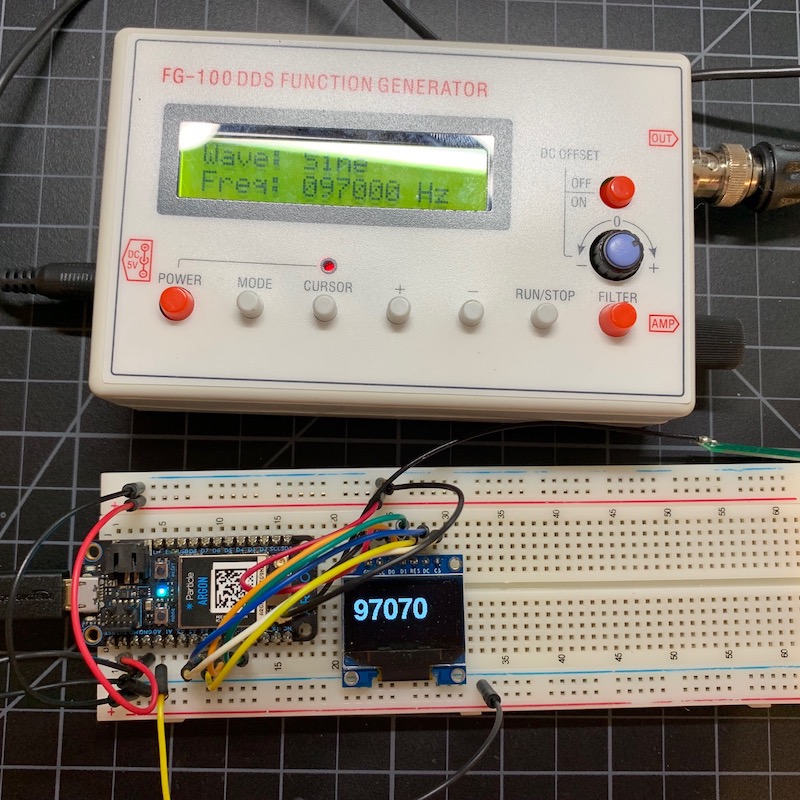
more-examples/03-frequency-counter
A slightly modified version of 04-continuous-freq-counter that samples at 200 kHz and displays the results on a SSD1306 display.
It's pretty close (97000 vs. 97070 Hz.)!
Version History
- 0.0.1 (2019-09-27) Initial version. There may be bugs still.